Tuesday, January 31, 2012

Early Morning Snow

 Cat on a prawl. It must be tough existence to be a stray cat in Canadian winter.


Steady pace of this cat made beautiful footprint pattern in the snow.


Update: 8 hours later...
and 24 hours later.

Monday, January 30, 2012

We Have Snow!

But, no snowflake pictures, way too mild and wet. When I put the snowflakes under microscope they looked like cotton balls and melted within seconds. It looks like this season might be washed out as far as individual “typical” snowflake photos go. Still, I have managed to take few snapshots before it melted. We have a weird winter for Ontario.

Deck stairs in early light.


Hiding morning sun.

Wednesday, January 25, 2012

Sea Salt Macro Pix Revisited


Since I wasn’t completely happy with macro photos of the sae salt I took last week I’ve decided to give it another try. I think it worked out a little bit better. I have placed the salt in clear glass dish that was sitting on top of Plexiglas box and then I put halogen flood light directly underneath. Still, not what I wanted so I placed flash to the front and side and set it at 1/128th power so it will not overpower the bottom light. Much better, but not there yet. Next, I have placed 67mm 80A blue Kenko filter I have from SLR days underneath the glass dish so that halogen light will pass through before hitting the salt. That did it. Next option was to try flashing some colorful backgrounds placed under the salt to see what will happen. I used same card as in my “Oil on Water” shot, colorful golf balls, and it turned out OK. I have tried another card with red flowers and it was different. I don’t know how far I can go with this project but it surely was fun.

Himalayan Mountain salt with halogen light moved to side.

One flash lighting the card at full power and second flash from front and right at 1/128th power. Sea Salt.

Red flower card underneath.

Setup for picture #1 and #2.

Blue filter under the salt.

Sunday, January 22, 2012

Another Winter Project

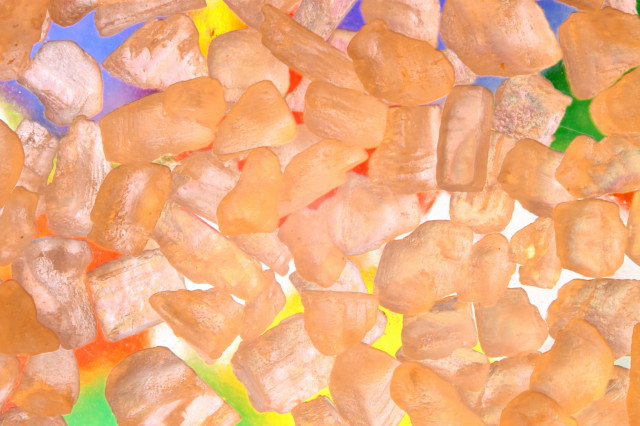
As I was thinking few days ago where I am going to set-up my microscope mounted with camera to photograph single snow flake I received email from my blogger friend challenging me to do just that. What an incredible coincidence! Looks like we shutterbugs think alike. So, out I went, let the microscope and slides cool down to below freezing temperature, got the lights set up and started collecting snowflakes. But I was out of luck. The snow we got overnight was more like a frozen fog and all I saw was tiny ice crystals that reminded me of sea salt. Eureka! I will shoot salts instead, who knows, it might even make a decent image. Well, it wasn’t to be. It was interesting but I am not sure I would print them. Still, here they are.
I have expected to see beautiful, clear crystals but what I saw looked more like sand. (Oops, another macro photography project: sand. That one has to wait few months, though). I will be watching weather forecasts for some nice heavy snow, I am all set up and ready to go.

Himalayan Pink Mountain Salt Crystals are the same size as regular table salt.
50mm macro with 2X extender and 31mm extension tube, f/22, ISO 400, lighted by 1,030 lumens halogen spot light. Focus was assisted by macro focusing rail and focused in live view zoomed down to maximum and 2 sec. shutter delay.

Coarse sea salt, same camera settings as above.
Setup.

Saturday, January 21, 2012

Nature’s Shapes

When I was working in a kitchen with Napa cabbage it struck me how beautiful this leafy vegetable is once you remove the outermost leaves. It is such a simple beauty.

Friday, January 20, 2012

Dancing Smoke Update


Since I am practically newbie when it comes to editing in Photoshop Elements, which has a fairly steep learning curve, it took me good part of a day to figure out how to put different colors into same smoke. I learn the best by just hacking at it on my own, this way I will remember the technique for very long time. Of course I had a great help from fellow blogger The Bonnie 5, very talented photographer, and also my books on PSE7. This was real fun project and I am sure that I will return to it once it warms up, I was shooting in a garage where it was just above freezing. Now I have to find another indoor project to shoot. Maybe I will clean basement instead…nah, not fun!

Thursday, January 19, 2012

Dancing Smoke

Actually, I should have called it Smoke Dancing with Photoshop, it would be more accurate. This is so simple to photograph, once you know how. There are quite a few variables for these shots. Aperture, synch speed with flash, ISO, distance of flash from smoke, distance of smoke from background… It is definitely better to take these shots in a large and draft free room. I have tried to do it in a bathroom with exhaust fan (my incense sticks stink!) but there was so much stray light bouncing all over the place that the background was grey no matter how much I choked down the side shields on my flash gun. Out to the garage I went. What a difference the large space makes! Background was so black it didn’t need any retouching and I had a space to move the flash around. It is fun to find all sorts of shapes in these smoke photographs.

Doesn't it look like spine and a skul?

I see hummingbird head.


Wednesday, January 18, 2012

Oil on Water Abstract Images Set-Up


As promised here is simple way to take some amazing abstract pictures of oil droplets on water. All you need is a glass dish with clear bottom, some sort of glass table if you will be using small dish like I did, some colorful picture or paper for background and spot light or table lamp (with mini fluorescent or halogen bulb), small bowl for oil and eye dropper. Since the focusing is so critical good tripod is a must and focusing rail is big help but not necessary. The tripod, background and eye dropper are the most important items for this shoot. I used birthday card with images of different color golf balls and tees and also book cover from “Color mixing bible”. Both have bold and clear colors. When you start shooting it is good idea to pre-focus the lens and get everything ready. Use the depth-of-field button on your camera to make sure that the background is out of focus. Since I was using 50mm macro lens in 1:1 ratio with very shallow depth-of-field even at f/11 it is not a problem. If the background is too sharp even at lowest f-stop you have to increase distance between water surface and background picture. All is left to do now is to play around with exposure and start dropping tiny drops of oil. If the droplets combine, break them up with sharp needle or toothpick just like stirring coffee with a spoon. When you do that and look through viewfinder you will see amazing scene.

I shaded the lamp with silver Mylar to protect lens from stray light and to reflect more light on background. It is the background that lights up the picture. Notice the small dish for water.
Camera is mounted to focusing rail.
Background for pictures #1 and #5.
 Background for pictures #2, 3 and 4.

I took a movie of breaking the oil drops and it looks like some Sci-Fi flick.

Oil on Water Abstract Images

Surfing Internet can lead you to some very interesting places. Yesterday I was looking for technique to shoot “dancing smoke”. Since every web page or blog has links to other places I came across another interesting project for indoor photography that I found fascinating – oil droplets on water surface. Nice images but no explanation how it was done. Within minutes of searching I came across Karli’s blog that had what I was looking for. How nice of her to share her knowledge!


I have decided to share my little secrets as well. I will post my set-up for these interesting images on my next blog.

Tuesday, January 17, 2012

Strawberry Drop Set-Up


Foundation of my set-up for this shot was my home made light tent frame. I build it from CPVC 1/2” water tubing and several elbows and “T” fittings and use it for almost all of my indoor close-up shots.
For this particular shot two things are very critical: focus and target. In order to have the main subject as sharp as possible I had to construct sort of scaffolding where I could clamp target that was about the same size as strawberry and as close to location in water as possible.


To do that I have tied steel nut to a string and then lowered it into wine glass. When focusing was done I have raised the nut to a location about 5” above the surface of water. This gave me precise spot from where I would drop the strawberry. It must be dropped from exact same spot every time. I dropped the strawberry from directly underneath the nut, it actually came in the contact with the nut.

In order for strawberry to stand out you will need strong but filtered backlight. I used Vivitar 285 flash triggered by radio and I was strobing through prismatic Plexiglas and diffuser screen. I didn’t try it but I think that you can use white bed sheet and strong spot light or table lamp for the back light. It is worth to experiment with.

The black strips on side of wine glass were created with 2 pieces of black cardboard placed at angle behind and to the side of the glass. You just have to move it around for your desired effect.
The main flash was placed to one side of camera and about half way between lens and glass. Since it was so close I filtered the flash with a sheet of toilet tissue. Again. The flash was triggered with radio.
Now that everything is set-up all you have to do is keep dropping! One more thing: don’t forget to clean the wine glass after every drop. Unwanted droplet of water on front or sides of the glass will ruin your perfectly timed shot. I am speaking from experience, been there, done that.
It can be very tedious but rewarding shoot. I ended up with 1 good shot for every 20 drops. Thanks heaven for digital photography!

Monday, January 16, 2012

Strawberry Drop Revisited

I had another go at strobing a strawberry dropped into wine glass. After about 60 drops or shots I have managed to capture one that is presentable. It is incredible how close it is to have a so-so picture, really lousy one and one you want to print, it is such a small fraction of a second. Patience and persistence are paramount to this type of photography.

Thursday, January 12, 2012

Update to Interesting Shadows


Photography is painting with light but this shadow saga is getting really confusing for somebody like me that doesn’t know too much about modern vapour lights.
I did some searching on the Net and discovered that the lower blue spotlight is most likely mercury vapour light and the orange street light above it is sodium vapour light. OK, not much to it, except: that blue light casts orange shadow and orange light casts blue shadow! I will have to communicate with somebody that designs street lighting to find out why the colors are reversed.

You can see from this projection that higher orange street light’s shadow is in front and blue spotlight’s shadow is in back…

…yet the shadow colors are reversed! Why?!?

Interesting Shadows


On one of our after dinner walk here in town we have noticed very interesting shadows on the bridge decking. This bridge is century old railroad trestle that was converted to walking trail bridge with street lights and chain-link fence on both sides. Last year it was renovated and street lights that lined one side of bridge were removed and replaced with large street lights at each end with additional rectangular spotlights. They each burn at different temperature and consequently cast different color shadows, one is orange and the other is blue. Where the shadows overlap the color changes to usual dark grey, almost black shadow. These shadows only appear very close to subject that casts the shadow, in this case chain-link fence and fence posts. Now I have to find out what sort of physics are in play here, it will be fun.

The lights in daylight...
...and at night.
Notice how quickly the shadows lose definition...
...and how the intersecting shadows turn black.

Photos at night: Canon Rebel T1i, EF 36mm at f/11, 05 sec., 1600 ISO, Cullmann tripod, Cullmann ballhead.


Wednesday, January 11, 2012

Monday, January 9, 2012

Another Full Moon Set

January 9, 2012, 7:41AM

How lucky I was to have two consecutive moon sets in clear skies and mild weather, in December and January, one of the grayest months on a calendar. And, again, the Moon didn’t disappoint me and neither did sunrise that was happening at the same time. When Moon was close to horizon it took on uncharacteristically yellow hue, last month it was reddish. When I turned around 180 degrees the Sun was still below horizon and the sky was flaming red and orange and as I turned toward Moon the sky turned bright blue. Quite a show! Next full Moon set in the morning will be on February 7th at 7am. Who knows what that day will bring?

January 9, 2012, 7:40AM


 January 9, 2012, 8:01AM