Monday, November 5, 2018

I am back. I think. 😕

It is hard to believe that I didn't post for 5 years! FIVE YEARS!!!
Thad's incredible considering that I shoot pretty much every day and that I keep buying new gear.
This post should be about my newest favorite camera, Panasonic Lumix FZ300 that I just love.

The stabilization that is build in is nothing short of technological marvel and the Zeiss lens is incredibly sharp . Only drawback that I see after using it daily for a year is very extensive menu and options. The learning curve can be pretty steep. However if you select iAutomatic it operates like any advanced Point & Shoot camera.
Since I bought this camera (I also bought FZ200 year before) I use my Canon cameras (450D & 500D) only for astrophotography.

Monday, October 21, 2013

Storage for Astronomy Gear


As is the case with almost all the hobbies we tend to accumulate quite a collection of a gear that we need to practice that particular hobby. Astronomy and Astro photography are not any different, especially Astro imaging. There is always something better, read more expensive, that will help us to make a better image. In my case however, it was an absolute must when I switched from Alt-Azimuth mount to German equatorial. You just can’t take a long exposure frames with Alt-Az mount. And, long exposure is an absolute must for faint Deep Space Objects (DSO) like galaxies and nebulas. In a year that I started imaging I have accumulated impressive number of cables, eyepieces and all sorts of adapters that are necessary for this hobby. With that comes a realisation that all that stuff has to be safely stored somewhere. It took me about two months to decide on concept and storage units but I am very happy with my design.
One very practical aspect of this modular design is that I can put any or all of the drawers in the bottom of a trunk of my car and take it on the road to the dark site for some serious astro imaging.
 
See for yourself as picture is worth a thousand words.


This is tripod storage. The largest tripod is for Celestron Advanced VX Mount, the smaller one is for Nexstar SE mount and heavy duty Manfrotto for wide field Astro photography.
 
This is where I store rest of the gear. From L. to R. on the floor is power tank, heated dew shield for telescope, NexStar mount, optical components storage tower, AVX mount, and storage tower for cables, tools, optics cleaning stuff and camera with flip mirror.
On top is laptop for driving whole thing, big time entertainment and telescope.
 
Again, L. to R, top row: Solar finder with Telrad in dew shield, Baader Solar filter, eyepieces and filters.
2nd row: Illuminated and regular reticles, 1.4x extender, .68 reducer, Orion Planetary camera, .5 reducer for Orion camera, Celestron SkyQ Link WiFi Adapter. Next is storage for JMI Motofocuser, camera and focuser adapters, other adapters and diagonal.
 
 
The right storage tower holds all the USB and serial cables, tools for setup and adjustments, Hand Controller with cradle, optics cleaning supplies,  AC and DC camera supply (I have built the DC adapter) and Canon Xsi (450D) that I have modified myself for full spectrum imaging and 2” flip mirror is in same drawer.


Saturday, October 12, 2013

Photographing Lightning Storm


Few times a year we get a heck of a light show in our parts of a wood here in South-West Ontario. Back in September 11 just after sunset was one of them. It was one bolt after another not too far away what looked like London, Ontario area. It wasn’t raining yet so I scrambled to get my camera, tripod and lens ready and do all the settings on camera before it started to rain cats and dogs. Since I never took a shot of lightning before I was just guessing that I will have to use lowest ISO speed so that the foreground will not be too bright and a long exposure because nobody has any idea when the lightning will strike. It worked. All the pictures were taken with Canon T1i (500D), Sigma 10mm-20mm zoom set at 10mm, ISO 100, f/3.5, 15 sec. exposure and triggered with Yongnuo RF-603 C1 radio trigger. Second and third picture shows forming of a tornado funnel, this area had some bad tornadoes, but after few minutes the funnel disappeared.
 
Here is my very first shot of a lightning.


You can see the tornado funnel forming with heavy rain in center.

 
The funnel is getting wider instead of more tapered and eventually dissipates.
 
 
I don't think that these bolts struck at same time. 15 second exposure will do that.
 

Sunspots Photography using Telescope

Processed from a video taken by Orion SSSIV Color camera and .50 reducer in order to double the size of image.

With the Moon shining bright in the sky and turning bright stars into dim and fuzzy point of light, the only astro-imaging that I can do is Sun and the Moon. Of course, for the Sun you need a special filter to protect not only your eyes but the scope as well. Another must-have accessory is Sun finder. For filter I am using Baader full aperture solar film filter . At first sight it looked wrong because the film is wrinkled but it has to be. For a photographer it is quite unusual because we are used to perfectly flat glass when you mention “filter”. But I do not argue with results.
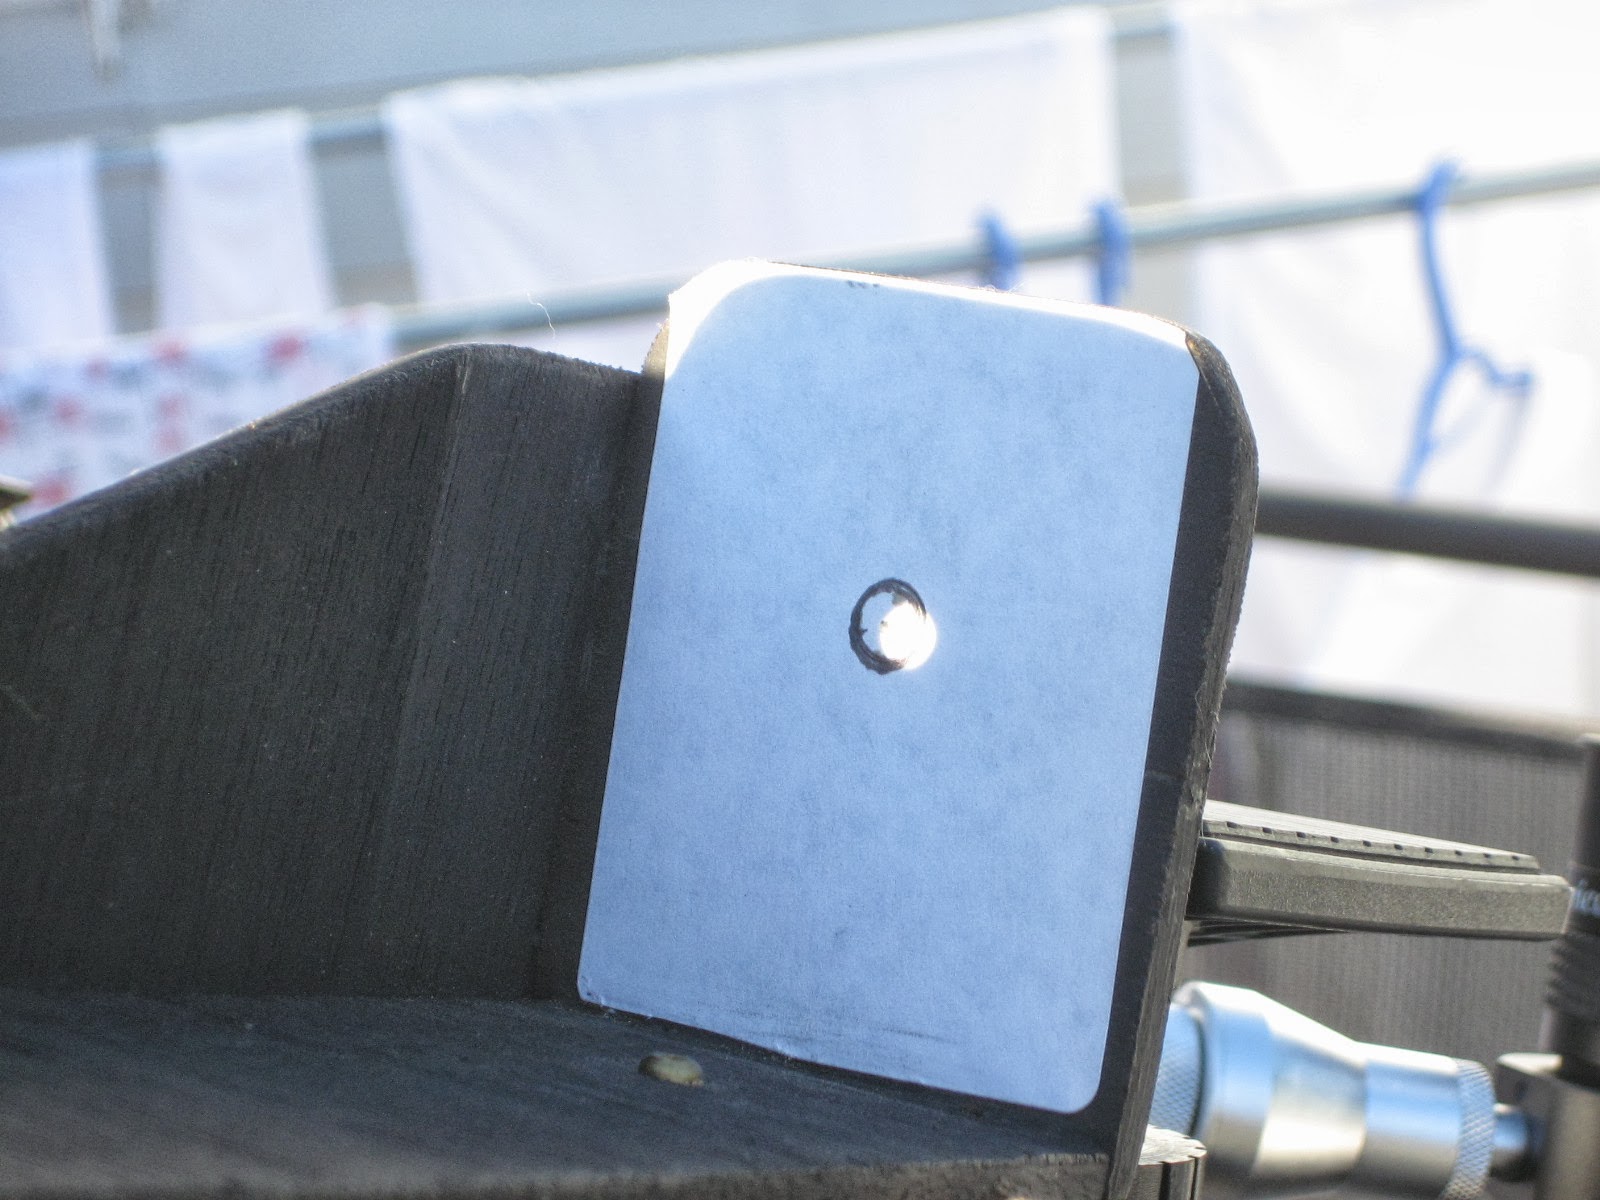
I have designed and build my own Solar finder attached to regular Telrad Star finder base. It is basically 2 pieces of flat thin plywood. Piece facing Sun has a small hole drilled in center and projects sunlight onto second piece that is 6” away and on parallel to front piece. See the picture.
To say that I photograph Sun spots is a bit misleading because I am actually using video camera, in my case Orion Solar System camera. It is necessary to use video because of seeing condition viewing Sun surface, it always moves in and out of focus due to atmosphere density between camera and Sun.
When the video is recorded it is processed in a frame stacking software Registax6 to sort and combine all the frames, I usually take 300 frames (20 seconds @ 15 fps). After that the final image is processed in Photoshop to add color since all the original frames are white.
 
And here are photos of my setup with footnotes.
 
 
This is my Solar setup with filter Sun finder and my computer dark shelter (showing on left side).

 
Projector screen of Sun finder. The projection is exactly as I see it in telescope.

 
My JMI Motofocuser and Orion Solar System camera. With magnification that this camera provides it is a must to have a motorised focuser. If I try to focus manually the scope shakes so much that I do not see a clear image.

 
Laptop is absolutely essential and since I take images of Sun the screen has to be protected from sunlight. I have designed and build a shelter that can be broken down into 3 pieces for storage. Assembly takes about a minute or two and storage space requirements are negligible.

 
Here is one side and back/top. I have constructed it from 1/4" foam board , covered it in flat black illustration card stock, all from a Dollar Store, and edged it with a Canadian staple, the "Duct Tape". Yes, duct tape rules up here in Canada!
 
 Processed from a video taken by Orion SSSIV Color camera without reducer.

Monday, August 6, 2012

One More Landscape Shot with 10mm Sigma Lens

More I use this lens more I am impressed with what it can do. Here is a shot from about 2”above road with lens axes parallel to the road. Every part of this shot is sharp – from about 10” to infinity. Incredible!

ISO 200, 1/500 sec at f/5.6, 10mm shot in RAW

Sunday, August 5, 2012

Sigma 10 - 20mm f/3.5 EX DC HSM AF Zoom Lens


I am really glad that I have finally went ahead and bought myself a super-wide angle lens! I was thinking about extra wide angle lens since I bought my Canon EOS but I just didn’t feel like spending more money on one lens than what it cost me for the camera and a kit 18-55mm zoom. Last week I was surfing for this type of lens and came across Adorama that had a special on this lens with a kit: UV filter ($75), lens cleaning kit in its own zippered pouch and lens cap keeper. That was a very good deal so I bought it. After receiving it I immediately took some test shots and I was very, very pleased! What an incredible piece of glass it is. Yes, glass, not some cheap plastic! What surprised me was that lens was made in Japan. These days camera stuff usually comes from China, Taiwan, Korea or Indonesia, Japan is quite rare.
The lens really feels solid and is very well made, no wobbly or overly free parts. The focus and zoom rings feel very smooth and tight but not heavy. For a full review from professional photographer click here.
When compared to 18-55mm kit lens the angle of view is almost double as you can see in following test shots of Lake Lisgar: the angle of view is almost twice as much as 18mm lens at 102.4°. See the test shots bellow taken from a same spot.
Canon lens at 18mm.

Sigma lens at 10mm.

I bought this lens online from Adorama in New York City since locally it was almost double of what I have paid ($1,124.88 for used one at Amazon.ca), including duty and taxes. I was so impressed with Adorama’s and UPS service! The lens was ordered on Wednesday, August 1st at 1:31 PM and it was in my hand next afternoon at 4:56 PM! From New York to South-West Ontario in 27 hours and with custom check and Economy shipping on top of it. I like J.
One of my 1st HDR shots with the lens. The water lily pad in foreground was about 6 feet (2m) bellow and 3 feet (1m) away from the lens.  

Lake Lisgar, Tillsonburg, Ontario


Fantasy Landscape

Composite picture of three photographs.

As I was studying my “Photoshop Elements 10 - The Missing Manual” book I was wondering if I am able to create photo composite on my own. I had background already loaded since I was working in Lightroom 4 on some recent sunrise photos. Next question was: what do I add to make it interesting. Big orange Sun was nothing to sneeze at so I picked my favorite shot of Sun with transit of Venus. Now was the time to start working in PSE. I duplicated background as a layer mask and imported Sun with a layer mask. The resulting composite looked interesting but something was still missing. After browsing my catalog for ideas I came across a shot of flying Tundra Swans. Using a Magic Extractor I have separated one swan and erased the rest of the flock and the background sky.
Fantasy Landscape was done in under 10 minutes, thanks to this great book and Adobe videos on YouTube.
I remember when such a complex programs like Photoshop Elements with their huge learning curve would come with manuals going well over 1000 pages and weighing few pounds. These days, NOTHING, not even basic instructions.
Here are photos used in the landscape.


Screenshot of Levels in PSE10. Notice how the Sun was revealed in copy of background layer mask. The order in which the layers are stacked is all important.
Intermediate Landscape. Something is still missing here!