Monday, August 6, 2012

One More Landscape Shot with 10mm Sigma Lens

More I use this lens more I am impressed with what it can do. Here is a shot from about 2”above road with lens axes parallel to the road. Every part of this shot is sharp – from about 10” to infinity. Incredible!

ISO 200, 1/500 sec at f/5.6, 10mm shot in RAW

Sunday, August 5, 2012

Sigma 10 - 20mm f/3.5 EX DC HSM AF Zoom Lens


I am really glad that I have finally went ahead and bought myself a super-wide angle lens! I was thinking about extra wide angle lens since I bought my Canon EOS but I just didn’t feel like spending more money on one lens than what it cost me for the camera and a kit 18-55mm zoom. Last week I was surfing for this type of lens and came across Adorama that had a special on this lens with a kit: UV filter ($75), lens cleaning kit in its own zippered pouch and lens cap keeper. That was a very good deal so I bought it. After receiving it I immediately took some test shots and I was very, very pleased! What an incredible piece of glass it is. Yes, glass, not some cheap plastic! What surprised me was that lens was made in Japan. These days camera stuff usually comes from China, Taiwan, Korea or Indonesia, Japan is quite rare.
The lens really feels solid and is very well made, no wobbly or overly free parts. The focus and zoom rings feel very smooth and tight but not heavy. For a full review from professional photographer click here.
When compared to 18-55mm kit lens the angle of view is almost double as you can see in following test shots of Lake Lisgar: the angle of view is almost twice as much as 18mm lens at 102.4°. See the test shots bellow taken from a same spot.
Canon lens at 18mm.

Sigma lens at 10mm.

I bought this lens online from Adorama in New York City since locally it was almost double of what I have paid ($1,124.88 for used one at Amazon.ca), including duty and taxes. I was so impressed with Adorama’s and UPS service! The lens was ordered on Wednesday, August 1st at 1:31 PM and it was in my hand next afternoon at 4:56 PM! From New York to South-West Ontario in 27 hours and with custom check and Economy shipping on top of it. I like J.
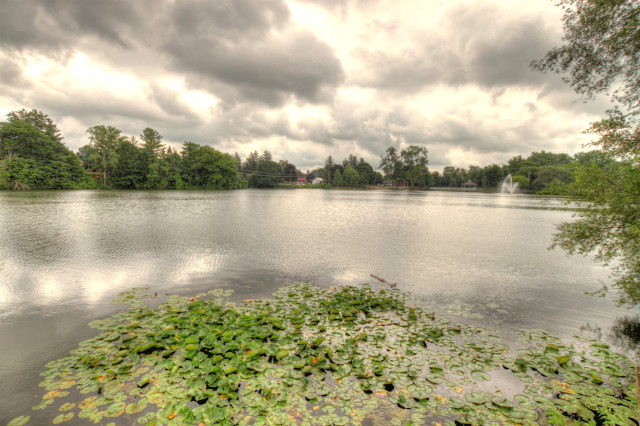
One of my 1st HDR shots with the lens. The water lily pad in foreground was about 6 feet (2m) bellow and 3 feet (1m) away from the lens.  

Lake Lisgar, Tillsonburg, Ontario


Fantasy Landscape

Composite picture of three photographs.

As I was studying my “Photoshop Elements 10 - The Missing Manual” book I was wondering if I am able to create photo composite on my own. I had background already loaded since I was working in Lightroom 4 on some recent sunrise photos. Next question was: what do I add to make it interesting. Big orange Sun was nothing to sneeze at so I picked my favorite shot of Sun with transit of Venus. Now was the time to start working in PSE. I duplicated background as a layer mask and imported Sun with a layer mask. The resulting composite looked interesting but something was still missing. After browsing my catalog for ideas I came across a shot of flying Tundra Swans. Using a Magic Extractor I have separated one swan and erased the rest of the flock and the background sky.
Fantasy Landscape was done in under 10 minutes, thanks to this great book and Adobe videos on YouTube.
I remember when such a complex programs like Photoshop Elements with their huge learning curve would come with manuals going well over 1000 pages and weighing few pounds. These days, NOTHING, not even basic instructions.
Here are photos used in the landscape.


Screenshot of Levels in PSE10. Notice how the Sun was revealed in copy of background layer mask. The order in which the layers are stacked is all important.
Intermediate Landscape. Something is still missing here!


Wednesday, June 6, 2012

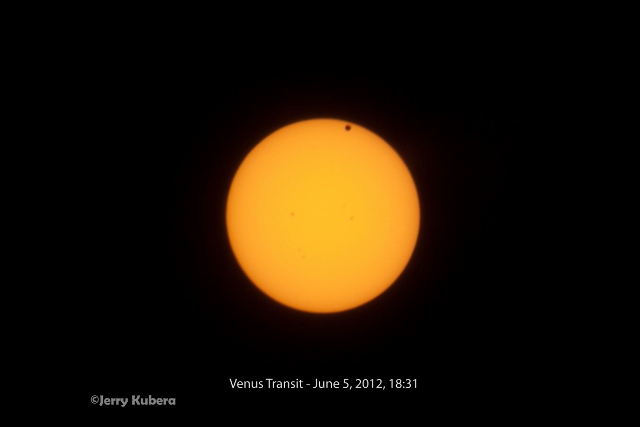
Transit of Venus, June 5, 2012


The transit of Venus happens in pairs eight years apart - but then with more than a century between cycles. During the pass, Venus appears as a small, dark round spot moving across the face of the sun, like a bug on a dinner plate. Here in South-West Ontario we were blessed with clear skies and relatively low humidity during the whole transit.
I was able to follow and photograph this astronomical spectacle from start at 6:04 PM until the Sun disappeared behind neighbor’s roof around 8:30 PM. It was well worth the time.


The equipment I used was Canon Rebel T1i, 75-300mm lens with 1.4X extender and arc welding filter plate in a place of dedicated Sun filter. Considering that the filter plate is a mass production piece made out of polycarbonate (Plexiglas) and not an optical quality glass, the photos are quite sharp. This particular filter has a gold coating that reflects the sunlight and keeps the filter cool. Simple setup that did what I wanted.


If you look very carefully you will see 5 Sun spots in 2 groups: at center left are 3 spots on top of each other and second group in center right has 2 spots.

Wednesday, May 2, 2012

Another Countryside Sunrise


One more HDR processed image. It is almost impossible to capture a decent sunrise without shutter bracketing at least 3 photos. For this shot I used 5 photos: Normal, +1.5, +3, -1.5 and -3 stops. For tone mapping I used Photomatix Pro v.4.2.

Friday, April 27, 2012

Time-Lapse Photography – First Experiment

Few weeks ago I have ordered intervalometer for my camera to try my hand at time-lapse photography. As is the case with most photographers that try this technique for their very first time, my first subject was moving clouds. I tried straight time-lapse and HDR time-lapse and was blown away how dramatic HDR sequence was! On second look I have realised how often I have seen HDR time-lapse clouds on television, especially in opening scenes for a golf tournaments. People that do not know about HDR photography just see great looking dramatic images without realising that there is quite a bit of computer “magic” involved. Photographers that are familiar with High Dynamic Range technique know how much work and especially time it takes to come up with a 10 seconds long sequence. Every HDR frame takes 3 images (normal, underexposed and overexposed frames) and every second of movie takes 24 frames.
24 x 3 x 10 seconds = 720 exposures. Yes, 720 photos for 10 seconds “long” movie.

This video is 4 seconds long and was taken with 1 frame evry 4 seconds.

HDR time-lapse.

Saturday, April 21, 2012

Shooting Outdoor Close-Ups in Dark

Technique to separate main subject from busy background.


Few days ago I was shooting blossoms of our peach tree but I wasn’t entirely happy with the outcome – the background was way too busy. Cutting one branch and bring it in the studio wasn’t an option and neither was placing some background behind the branch with blossoms. One fool-proof option opened to me was to wait till dusk and shoot with flash. And that is exactly what I did and results were not bad at all. I know that I should have used tripod but this was more about technique then producing a book quality image. It is too late now to re-shoot the peach blossoms, they are way past their prime, but I will use this technique for more outdoor projects where I want to separate main subject from the background.

 
Original image shot in RAW, 100 ISO, 1/125 sec @f/5.6, auto-focus with pre-flash assist, off camera E-TTL flash with prism lens and diffuser, 1st curtain, Flash Exposure (FE) -1 stop. For razor sharp image I would have to use tripod and strong light for focusing.

During RAW conversion to JPEG I adjusted levels and blacks so that background was more or less black.

After conversion I opened the image in Photoshop and cloned away the remaining background. Then I cropped and tilted the image. I was left with just a peach branch with blossoms against black background. Total time spent in Lightroom4 and Photoshop was less than 10 minutes.

Tuesday, March 20, 2012

Sunrise on First Day of Spring (Vernal Equinox)

When I looked outside this morning about half an hour before sunrise I thought that it will be just a regular partly cloudy day show. I packed my gear and headed out anyway and I wasn’t disappointed. What struck me, though, was that sky directly opposite to sunrise (due west) was more spectacular than actual sunrise once the sun got over the horizon.

 
Sunrise at 7:30


Western sky at sunrise at 7:39. Notice the long shadow of my tripod and a car. It is impossible not to have the shadows in a photo with the sun directly behind me. The shadows were about 75 yards long!

Monday, March 12, 2012

Stormy Clouds

This morning I was checking the weather radar on Internet and saw big storm coming. One look outside got me scrambling to grab my camera and head to countryside to get shots of some most incredible clouds that I have seen in a long time. Some actually looked like that a tornado funnel was forming. Interestingly enough all we got was rain and very little wind. As soon as it started to rain, all the clouds turned into a regular gray sky. I was lucky to capture them, they lasted only about 15 minutes.


Friday, March 9, 2012

Snow Shadow of a Tree


Yesterday we had most unusual weather that I have ever seen here in South-Western Ontario. It was a beautiful sunny morning with temperature hovering around freezing point. Then, within few seconds, no exaggeration, we got hit by a blizzard that reduced visibility to about 30 yards and covered lawn in a blanket of snow. Just as suddenly the clouds disappeared and it was sunny again. When I looked outside I noticed that all the snow has melted except in shadows. That is when I spotted the tree clearly outlined by snow. By the time I grabbed my camera, adjusted all settings and shot couple of frames the snow that laid where small branches were has already melted. Two minutes after this shot all the snow was gone. We got few more one-minute blizzards after that but I have not seen the shadows again. Still, I consider myself very lucky to see this.

Tuesday, March 6, 2012

HDR in Macro Photography?


Even though HDR is usually associated with landscape photography I have applied the same technique to macro shots. When I came across a water condensation on a window pane that was facing sun about an hour after sunrise (sun was very low) and the sun was reflected in water drops I knew that I will be dealing with very high dynamic range of light. The clear sky sun was magnified in the water drops while the background was very dark reflecting dark street and lawn in front of the house. I fired sequence of three shots (normal exposure, +2 and -2 stops) and then I have processed these shots in Photomatix Pro 4. The setup for shots were exactly same as in my previous blog from February 12th on macro photography. Actually, the water drops were in the very same spot. The photo generated by Photomatix was cleaned up in Photoshop Elements 10 and rotated 180°. Finished image looks like a shot from Sci-Fi movie.
Here is one of un-retouched photos that I have used.

Since I had my macro gear out I took few more shots, this time of condensation that was bunched together. For steadying my camera I used bag filled with lentils, it makes an excellent “tripod” that I use for my ground level shots.

The setup.

Bean bag is so useful!

Friday, March 2, 2012

Wonders of HDR

Here is my very first try at HDR, #1 tee at Tillsonview Faiways.

 Anybody that has taken picture of sunset or sunrise knows that what your eyes see is nowhere near what your camera see and records, be it film or digital. When I was doing my own developing in a darkroom it took long time and lot of trial-and-error to come up with a decent picture resembling what you have seen. With digital camera and HDR (High Dynamic Range) software it is done in minutes. Of course, if you want a really, really good picture it takes a lot longer since there are so many options. The way it works is that you take at least 3 shots (normal exposure, under exposed and over exposed) and then combine them in software. Sturdy and solid tripod is a must since the images have to be identical. There are lot of sources on Internet dealing with HDR but here is my favorite on Nature Scapes Net.
 
Here are 3 shots that I used to create my image.

Normal exposure (there was heavy overcast)

Plus 2 stops

Minus 2 stops

Saturday, February 25, 2012

More Closeup and Macro Photos

Hollyhock Seed

Nasturtium Seed

Another Snowflake 

 Center of Crown of Thorn flower

The closeup image is inside the white circle.

Photographing Vegetable Seeds

As I was fruitlessly waiting for another snowfall so that I could improve my technique to shoot individual snowflakes I was wondering what else I could photograph with my macro setup. As luck would have it I spotted vegetable seeds packets that were out on table for indoor planting next week. I have never looked at seeds from really close so I was blown away how colorful some are. In order to get decent magnification I used 21mm and 31mm extension tubes and for light I used Minolta 4 tubes ring flash with only left tube turned on.

Thai Chilli seed

Red Pepper seed

Red Radish seed


The setup.

Thursday, February 23, 2012

Photographing Individual Snowflakes


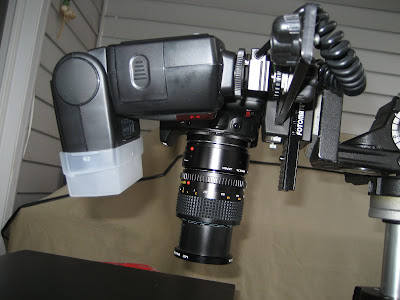
I have finally managed to photograph individual snowflakes with DSLR camera. Years ago I have made nice images with my old Minolta attached to microscope but microscope just doesn’t work all that well with my Canon EOS, I don’t know why. For these shots I was using Minolta 50mm 1:1 macro lens with MD/EOS adapter ring and 2X macro extender, focusing rail, off-camera Speedlite in manual mode and heavy-duty Manfrotto tripod. Aperture, shutter speed and focusing were all manual. For capturing the snowflakes I used black steel chalkboard that was cooled down for few minutes in a freezer and then placed in open area on the deck. When I had few snowflakes on chalkboard I placed it under the lens that was already pre-focused. This way I had to do only minimal re-focusing when I moved the board around. As you can see on picture of my setup, it was 0°C (32°F) when I took my shots and shortly after the snow turned to rain. We have very un-usual winter here in Southern Ontario, not too many opportunities to play around with this technique.

Very wet snow.

All snowflake pictures were shot @ ISO 100, f/11@1/200, Speedlite flash with difuser@1/2 power. Macro lens extender pushed the aperture to f/22